Help Projects Managing a Project
Managing a Project
If you are a Gold-Tier DNAGedcom Subscriber, you can create and manage projects.
The primary tasks involved in creating and running a project are:
Creating a Project 
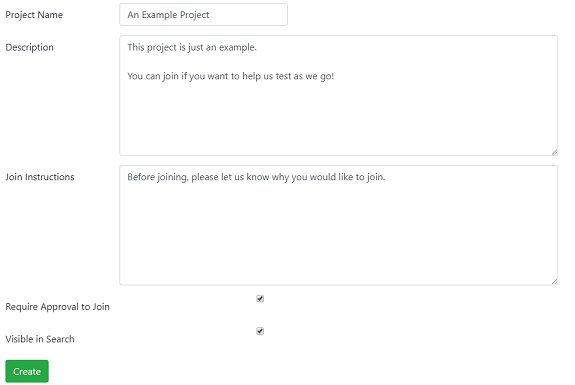
When creating a project, provide the following information:
- Project Name - This is a title for your project. Keep it short and sweet and to the point like "Collins Research Project"
- Description - This is a space for a longer description for your project. Be as detailed as possible, outlining goals for the project so other people know if they would like to join.
- Join Instructions - This is where you provide instructions for those who wish to join. This will only be seen when applying to join the project.
- Require Approval to Join - If checked, applicants to join will be placed in an approval queue. If not checked, applicants will be automatically approved upon request.
- Visible in Search - If checked, this project will be visible to all users within the Project Search function. If not checked, applicants must have a join link provided by an admin.
Inviting and Managing Members 
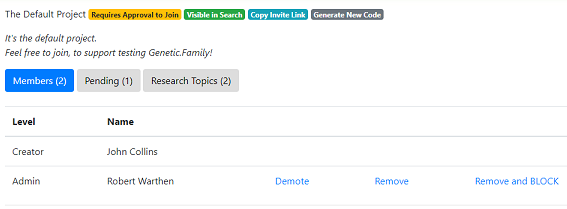
At the very top are two display-only tags and two buttons. The two tags will indicate if approvial is required to join, and if the project is visible in the search area. Beyond that are two buttons:
- Copy Invite Link - Click this to copy the Invite Link for the Project. In the event that your browser does not allow automatic copying due to security settings, you can also simply copy the provided text box that appears after clicking.
- Generate New Code - Click this to create a new Invite Link for the Project. Doing so will invalidate the old link.
By default, the project members are shown.
On a per-member basis, there are 3 actions:
- Promote/Demote - Creators can either promote a Member to an Admin, or if they are already an Admin, demote them to a Member.
- Remove - Creators/Admins can remove a Member from the Project. Removing the member from the Project will remove any shared items from being visible to the Project unless they re-join.
- Remove and BLOCK - Creators/Admins can remove the Member and add them to the Blocked list, preventing them from searching for or joining the project until removed.
When the Project requires approval to join, members who are applying will be placed into a queue for approval. From here, there are 3 actions:
- Approve - Approve and add the Member.
- Reject - Reject the application and remove from the queue.
- Reject and BLOCK - Reject the application and add them to the Blocked list, preventing them from searching for or joining the project until removed.
When the Project has any blocked members, they can not search for or be added to the Project. The Blocked list will show the people who are blocked. From here, there is only one action, to remove the block:
Creating Research Topics 
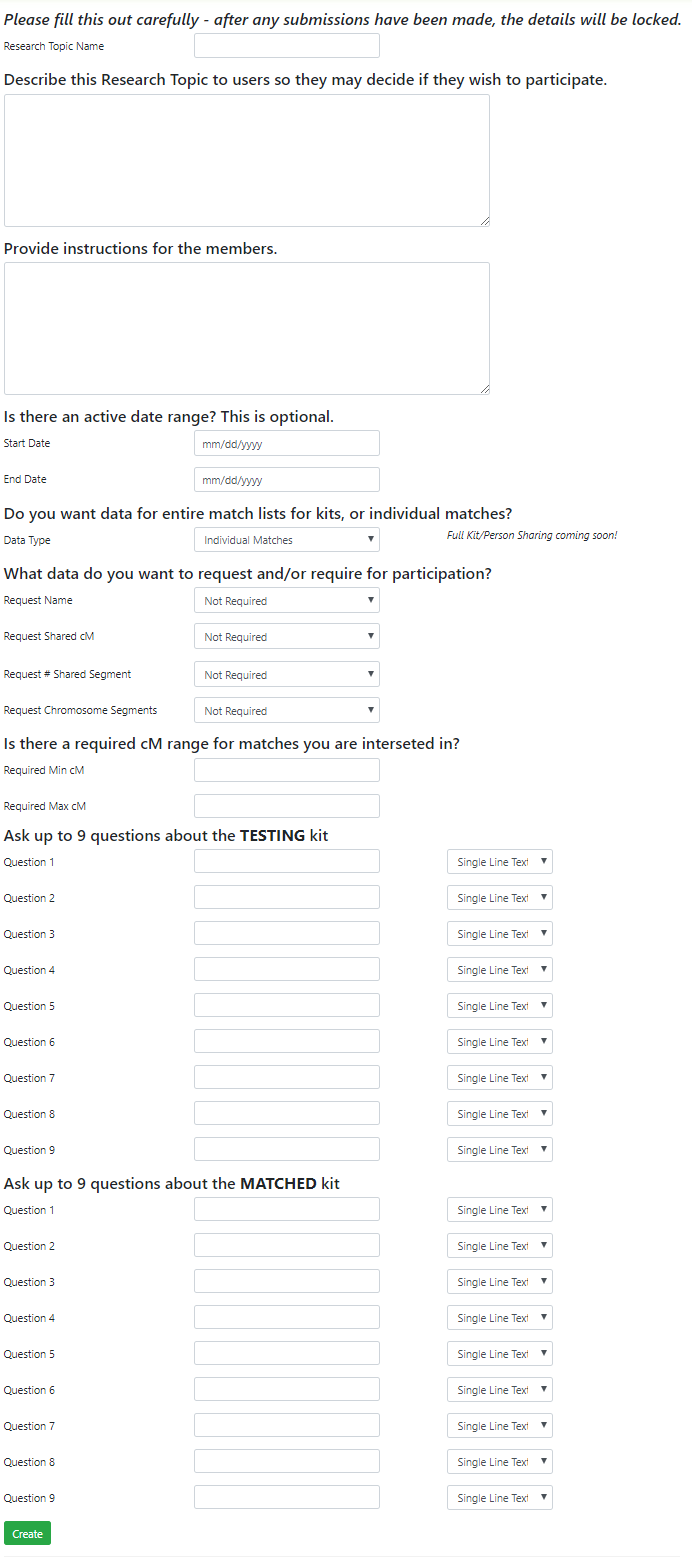
Within each Project, you can have any number of Research Topics. A Research Topic is designed to allow collaboration by sharing match data at a granular level, as required by the research itself. In addition to match data, up to 9 prompts for additional information about the person that is sharing or the match itself.
The following data items can be entered:
- Research Topic Name - A short, descriptive name of the research topic, such as "Known Second Cousin Relationships"
- Description - A more detailed description of the purpose and goals of the Research Topic.
- Instructions - Detailed instructions on how the members should choose the matches they will submit.
- Start/End Dates - (Optional) Date range for when submissions will be taken.
- Data Type - Matches or Entire Kits/People. If Entire Kits/People is selected, questions about the MATCHED Person below are not available, since they will be submitting entire match sets.
- Request Name - Select whether you will not collect, require, or request the name of the match. If "Reqeusted" is selected, the Member will have the option to submit or not.
- Request Shared cM - Select whether you will not collect, require, or request the shared cM amount. If "Reqeusted" is selected, the Member will have the option to submit or not.
- Request # Shared Segments - Select whether you will not collect, require, or request the number of shared segments. If "Reqeusted" is selected, the Member will have the option to submit or not.
- Request Segment Data - Select whether you will not collect, require, or request individual segment data. If "Reqeusted" is selected, the Member will have the option to submit or not.
- Questions about the TESTING Person - Up to 9 questions may be prompted about the testing person/kit. These questions will only need to be answered once per kit/person. Each question may be answered as either a single line of text, a large block of text, or a dropdown. If dropdown is selected, you may enter the options on one option per line
- Questions about the MATCHED Person - Up to 9 questions may be prompted about the matched person/kit. These questions will need to be answered for each submission. Each question may be answered as either a single line of text, a large block of text, or a dropdown. If dropdown is selected, you may enter the options on one option per line
Viewing Submissions 
On the bottom of the page are the shared submissions, sorted by by most recent at the top by default. Only fields you have requested or required will show, and if the member decided not to share a requested value, it will say Not Provided.
Clicking the "Remove" link next to an item will remove the submission. If you are a Member, you may only remove your own, however Creators and Admins may remove any submitted item.
To the right of the requested data will be the responses to each of the questions asked, if they have been answered. If it says Submitter then it is a question about the TESTING person, and if it says Match it is a question about the MATCHED person.
If you are a Creator or Admin, you will be able to see all submitted items. Individual members will only see their own items as well as the items submitted by others that have chosen to share with All Members. See the Participating in a Project Help Page for more information.
The interface for viewing Entire Kit/Person submissions will be live very soon. Submissions may still be taken in the meantime.